Author: Roman Savochenko
Contents
To maximize ease of deployment of OpenSCADA you can use live builds of CD, DVD and USB boot disks from Automation Linux distributive of the project OpenSCADA. A live disk provides the ability to download directly from it, and quickly get the desired working environment. When downloaded and running, the live disk does not use regular media, that is, you can not worry about the integrity and consistency of data on them. In general, a live disk is a convenient tool with a wide range of necessary software tools at hand and independent from the stationary software environment capable of implementing:
- demonstration and familiarization with the possibilities of OpenSCADA;
- installation of the complete, exhaustive and verified environment of an automated workplace (AWP);
- diagnostics of the software and hardware environments, as well as their recovery, in some cases;
- formation in special editions containing everything related to the target solution: technical and program documentation, PLC and ARM configurations, ...
The live disk is a packed operating system image and applications size of about 700 MB, written to a CD/DVD disk or USB flash storage. In its work, the operating system "on the fly" unpacks the necessary files to run programs and open documents, ie — does not use more RAM than with its stationary installing.
Live disks from Automation Linux distributive of the project OpenSCADA are built in several versions based on Linux distributions Debian, ALTLinux (old versions) and available for download, in the latest version of OpenSCADA, here: http://oscada.org/en/main/download/. Existing live builds from OpenSCADA have much more features than expected from the beginning:
- The ability to transparently save work changes when written to USB Flash. The function is provided by creating a disk partition, with the ability to record, on a free space of the USB-Flash. This partition is reflected on the root of the file system, or its parts, and all changes are written to it. In addition to storing work data in this section, you can install missing software packages from the Debian package repository, OpenSCADA or ALTLinux.
- Ability to combine an ordinary Flash data disk with a live Flash disk. Means recording live disk data directly to the USB-Flash file system — FAT16 or FAT32, which stores the functions of the usual data storage and adds the function of the live disk.
- Ability to install the environment of the live disk on a stationary storage. Allows you not to engage to the Linux operating system in-depth study and immersion when its installing, its configuring and OpenSCADA deployment. Enough boot from the live disk, make sure that the main hardware is determined normally, the required programs work and next, through a simple procedure from the desktop icon or a separate boot menu, install it on a stationary storage. The resulting installation will be identical to the environment of the live disk.
1 Combined-hybrid ISO-images of the live disk
Currently, hybrid ISO images of "the live disks" (*LiveCD_USB.iso) are built mostly, which can be written directly to CD/DVD, USB-Flash, and also extract the contents for recording on USB-Flash with the FAT or EXT file systems.
The main option for creating a "live disk" is the recording on a CD/DVD, which allows you to use the standard tools of the original operating system. Additional, though in fact, already the main one, is the write to USB-Flash, which can be carried out from the environment of the Linux operating system, for example, from the environment of the same "live disk", recorded and downloaded earlier from a CD/DVD; or from the MS Windows operating system via Win32DiskImager.
![]() Writing a "live diske" image on USB-Flash will erase all data and make it unusable for use as a data storage unless you take into account the ability to write to a partition of the changes saving of the environment of the OS live disk that will be created when first downloaded from the live disk, in case ALTLinux, or user in the case of Debian.
Writing a "live diske" image on USB-Flash will erase all data and make it unusable for use as a data storage unless you take into account the ability to write to a partition of the changes saving of the environment of the OS live disk that will be created when first downloaded from the live disk, in case ALTLinux, or user in the case of Debian.
The address of the disk to write the ISO-image is "/dev/sd{x}" and you can found it by calling the $ dmesg console command immediately after connecting the target USB-Flash disk. From the Linux environment, an ISO-image can be written as follows:
# Recording an ISO-image to USB-Flash:
$ dd if=Debian_9-OpenSCADA_0.9.0-TDE_R14-amd64-LiveCD_USB.iso of=/dev/sd{x} bs=4096
# Recording an ISO-image directly from the loaded CD/DVD live disk:
$ dd if=/dev/sr0 of=/dev/sd{x} bs=4096
2 Live USB-Flash disk with the file-system FAT or EXT
Earlier, separate builds of images were made for recording them on the FAT file system. Currently, these images are specially built only for FirmWare of a number of PLCs (*flash.tar). You can use the hybrid ISO-images described in the section above to create live USB flash disks of general purpose.
The advantage of the live disk on USB-Flash, as it was previously mentioned, is a combination of USB-Flash drive features as a data storage and as a live disc at the same time. Also on the basis you can create compact, reliable and functional solutions of the embedded systems based on OpenSCADA, such as Programmable Logic Controllers (PLC), the panel controllers (with a touch screen), as well as simple SCADA-servers and operator "quickly made" SCADA-stations, by recording a live disk to the stationary data storage (HDD, SSD or Flash). The reliability of this solution is achieved by placing the main non-modifiable software in the packed file, and operational data on the journaled file system.
You can write "live disk" data to a file system from any OS (for FAT), but install the boot loader only on the Linux operating system, for which you can use a live CD/DVD disk from the previous section.
The procedure for creating a live disk is the following, for the data of the hybrid ISO (Debian and ALTLinux):
- To simplify the operation of extracting and copying of the ISO-data let perform it into the twin-panels file manager mc. For mc allowing to view the ISO-image you need install the utility isoinfo, which ordinary places into the package "genisoimage".
- Take original file of the ISO-image, open it into mc and copy from it to the target FAT or EXT file system:
- Debian: the directories "isolinux" and "live"; rename the directory "isolinux" to "syslinux", on the target file system.
- ALTLinux: the directory "syslinux" and file "live".
- Rename the file "syslinux/isolinux.cfg" to "syslinux/syslinux.cfg", for FAT, or "syslinux/extlinux.cfg", for EXT.
- ALTLinux: Append to the argument "append", of the section "label live" of the file "syslinux/syslinux.cfg", the sub-string "automatic=method:disk,label:MY_LAB" or "automatic=method:disk,uuid:MY-UUID", where MY_LAB and MY-UUID you can obtain, for partition of "the live disk", by the command aid $ blkid.
- ALTLinux: Replace the file "syslinux/gfxboot.c32" to analogous one file from current file system (ordinary it is placed into the directory "/usr/lib/syslinux/").
- Install boot-loader from the command line, all from the superuser: $ su -
- Unmount the disk: $ umount /dev/sd{x}1
- Initialize the MBR of the disk to the correct value: $ ms-sys -s /dev/sd{x}
- Initialize the boot loader: $ syslinux /dev/sd{x}1
For a "live disk" image on FAT (ALTLinux), everything from superuser: $ su -
- Connect the target disk and obtain its address: $ dmesg
- Mount: $ mkdir /mnt/tmp; mount /dev/sd{x}1 /mnt/tmp
- Unpack the contents of the firmware archive onto the mounted disk: $ cd /mnt/tmp; tar xvf /var/tmp/LP8x81-ALTLinux6-OpenSCADA_0.9+r2302-i586-plc-rt1-up.flash.tar
- Find out the UUID for the filesystem of the target disk: $ blkid | grep /dev/sd{x}1
- Modify the file "/mnt/tmp/syslinux/syslinux.cfg" at the end of the line "append initrd=alt0/full.cz live ... disk,uuid:4EB3-0478", where it is necessary to set the previously obtained UUID.
- Add or modify the file "/mnt/tmp/syslinux/lang" for specify the locale-language of the interface by default, for Ukrainian — "uk_UA", for Russian — "ru_RU", otherwise it will be English.
- Unmount the disk: $ umount /dev/sd{x}1
- Initialize the MBR of the disk to the correct value: $ ms-sys -s /dev/sd{x}
- Initialize the boot loader: $ syslinux /dev/sd{x}1
![]() This method of the live disk deploying requires knowledge of Linux and the command line interface (console), as well as the basics of the disks partitioning because with an wrong initial partitioning of media the booting may not be passed.
This method of the live disk deploying requires knowledge of Linux and the command line interface (console), as well as the basics of the disks partitioning because with an wrong initial partitioning of media the booting may not be passed.
3 Saving the working data of the live disk to the USB-Flash partition
The Live disk, as mentioned early, allow you full-featured work with saving the working data, and also updating the programs (excluding the system programs and the OS Linux kernel). Typically that possibility has sense only for USB, HDD, SSD storage.
In the case of Debian distributions, a separate section for storing work data, with the label "persistence", should always be created specially, and in the file "persistence.conf" on it also specify the file system or part of it to be reflected on the record (for example, "/home"). To reflect the entire root file system, you must write "/ union" in the file. As the file system of this partition, it is better to use "EXT3". To create a partition you can use the program partition manager, for example — gparted.
In the case of the ALTLinux (6) distribution, and the direct recording of the hybrid ISO image, such a section will be created at first startup. When creating a live disk on FAT and EXT, you need to create a separate partition labeled "alt-live-storage" and the file system "EXT3" that can be done in the partition manager program, for example — gparted.
4 Booting
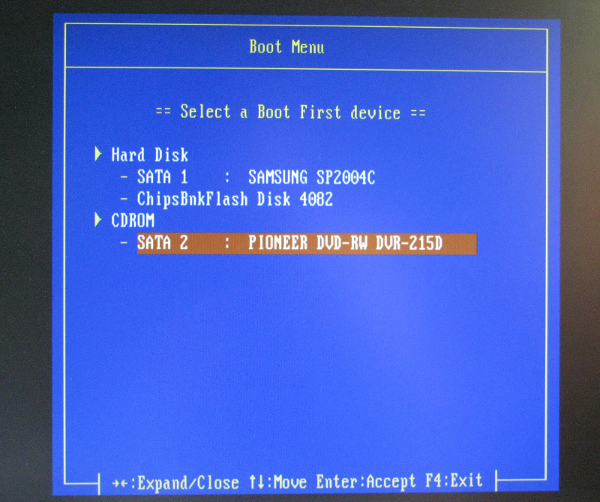
To boot from the resulting "live disk" you need to reboot the computer and at the very start of loading to the stationary OS press the key to enter the BIOS boot menu and select our media (fig. 1). On different computers, the enter key to the boot menu may differ and be one of the following: "F8", "F9", "F10", "F11" or "F12". On some computers you can only change the boot order in the BIOS itself.
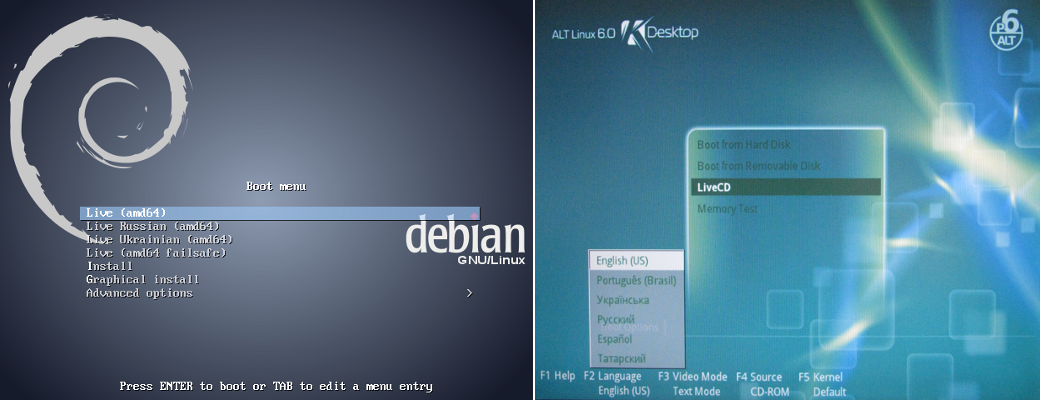
After selecting the device, you should see the boot menu for the live disk (Fig. 2) where you can pre-select the boot option in a specific language, for Debian, or your language, with the F2 key for ALTLinux.
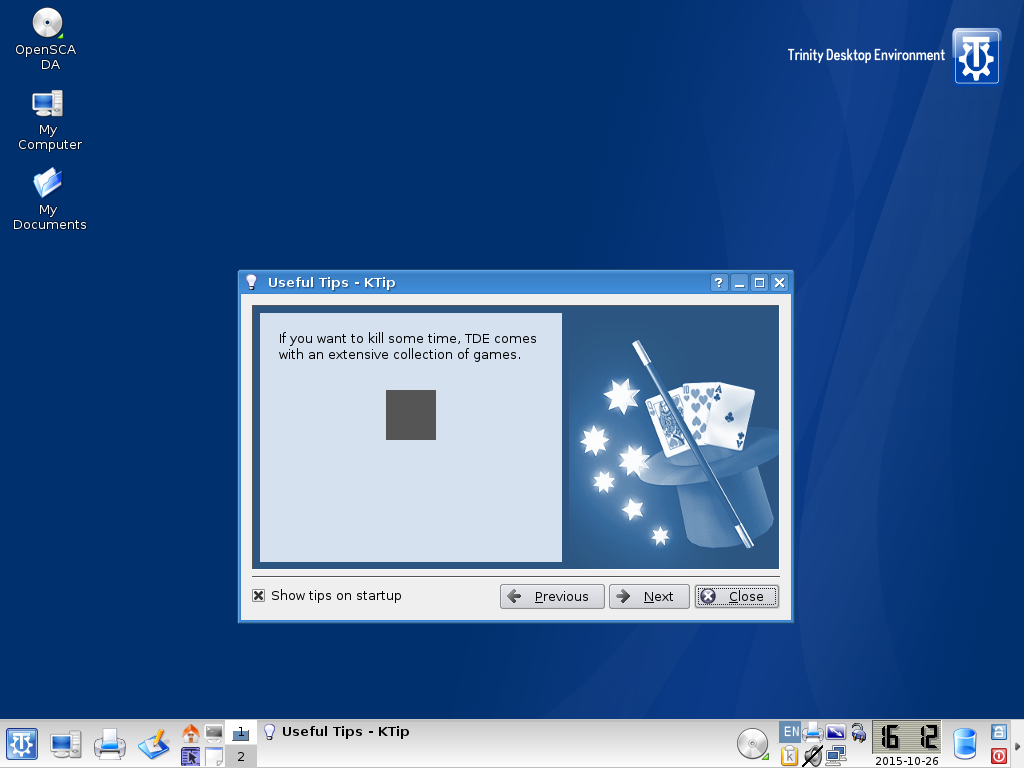
As a result of booting a live disk, you will get the TDE desktop (Fig. 3).


